
Evil Genius Labs
Purveyor of finely hand-crafted pixels. ꩜
Purveyor of finely hand-crafted pixels. ꩜


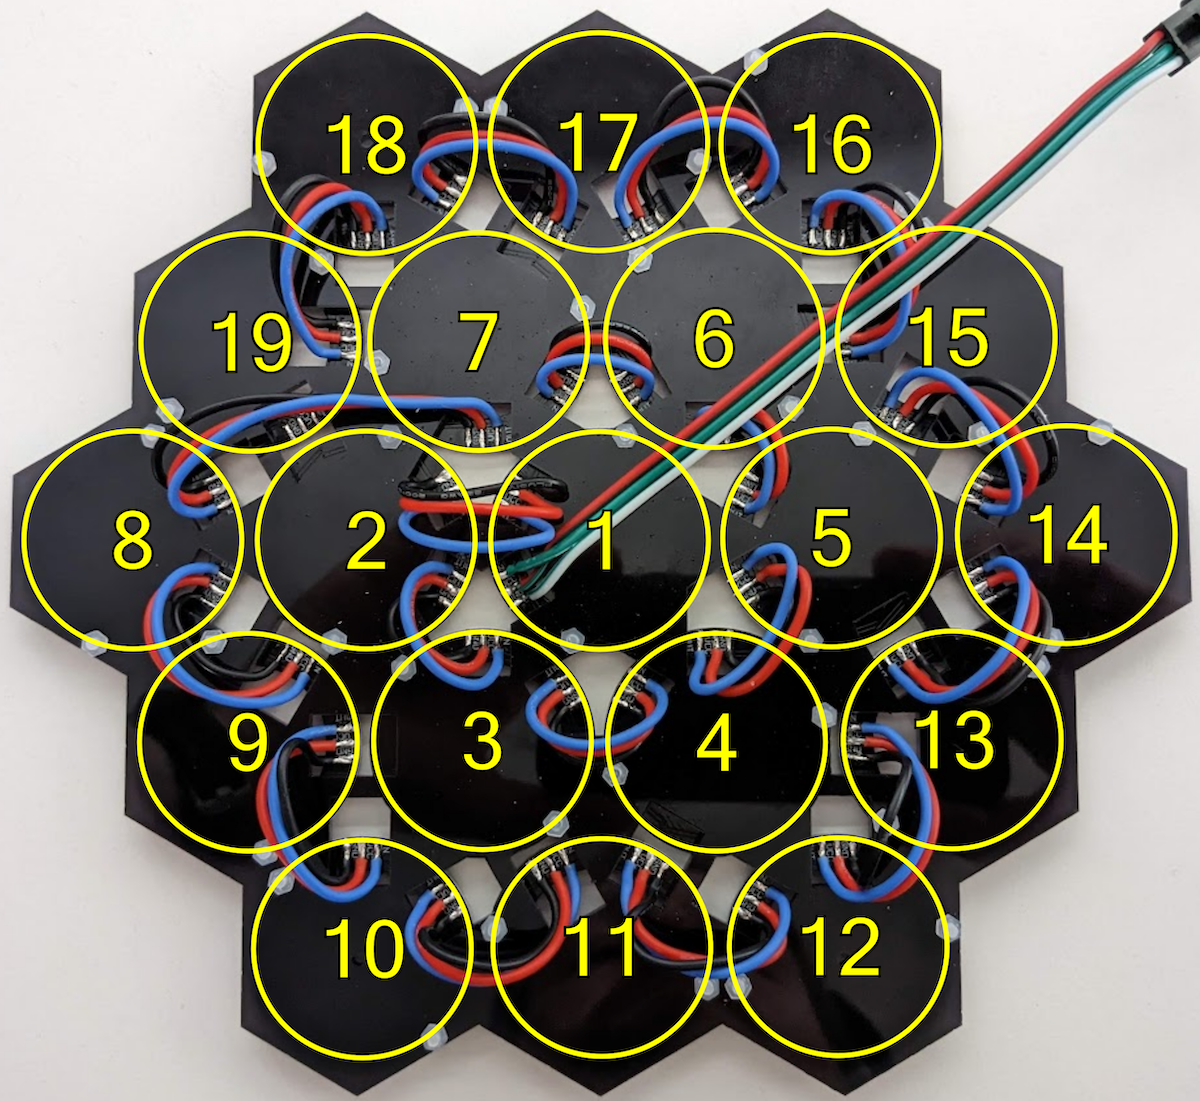
Mega CycloHex is a beautiful set of hexagonally-nested rings with 228 RGB LEDs, six touch pads, and an Adafruit QT Py SAMD21.
I have RGB LEDs in just about every form they come: strips, strings, rings, discs, etc. I constantly seek new and novel forms.
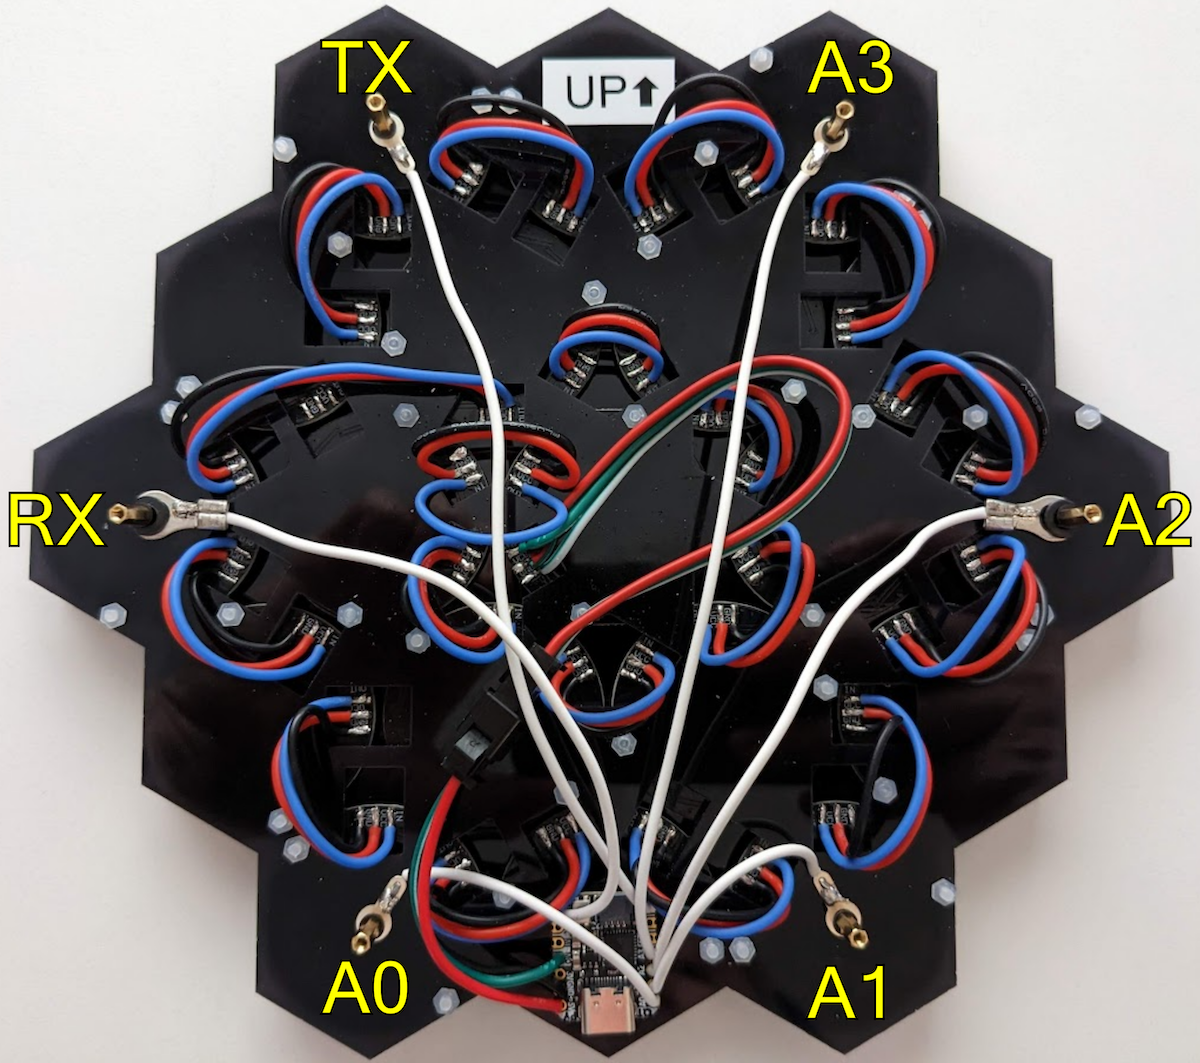
The six mounting screws are connected to pins (A0-A3, A6 & A7) on the SAMD21 QT Py, which supports capacitive touch on these pins. Most other QT Py / XIAO boards, such as the RP2040, do not support capacitive touch.
M2 hex standoff kit: $9.99
6 x M2x4mm hex standoffs (or M2x5mm, or M2x6mm, depending on diffusion desired)
The larger the standoffs used between LEDs and the front acrylic, the more diffused (or blurred) the LEDs will appear.
These costs do not include shipping. Also not included: your time, which is priceless.
I already had most of the parts on hand, so my total cost was lower, of course.
| Part | Qty | Total |
|---|---|---|
| LED Rings | 19 | $27.55 |
| M2 Metal Bolt Kit | 1 | $21.59 |
| Wire Kit | 1 | $16.95 |
| Black LED Acrylic | 3 | $16.17 |
| M2 Standoff Kit | 1 | $9.99 |
| JST-SM Pigtail | 1 | $9.99 |
| M2 Nylon HW Kit | 1 | $7.99 |
| M2.2 Solder Rings | 1 | $7.99 |
| Qt Py SAMD21 | 1 | $7.50 |
| Total | 25 | $125.72 |
Open source example firmware and web application: https://github.com/jasoncoon/cyclohex-touch-demo/tree/39mm-rings
Flash this code, using Arduino, PlatformIO, etc, to your QT Py.
Note that if you use different LED rings, or wire them in a different order, then you’ll need to adjust the coordinate maps in the code.
If you’d rather use one of the amazing Pixelblaze WiFi LED Controllers by ElectroMage you won’t be able to utilize the touch pads, but you will be able to control it via wi-fi via the awesome web UI!
Here are the settings and maps I use:
Map:
[[60,0],[51.961525,30],[29.999998,51.961525],[-0.000003,60],[-30.000004,51.961525],[-51.961525,30.000004],[-60,-0.000005],[-51.961517,-30.000011],[-29.999994,-51.961525],[0.000001,-60],[29.999994,-51.961525],[51.961533,-29.999985],[90,-0.000005],[98.038475,-29.999998],[120.000008,-51.961525],[150,-60],[180,-51.961525],[201.961517,-30.000011],[210,0.00001],[201.961517,30.000004],[180,51.961525],[150.000015,60],[119.999985,51.961517],[98.038475,29.999992],[44.999981,-77.942284],[23.03846,-99.903809],[14.999985,-129.903809],[23.03846,-159.903809],[44.999992,-181.865326],[74.999985,-189.903809],[104.999977,-181.865326],[126.961502,-159.903824],[134.999985,-129.903793],[126.96151,-99.903809],[104.999985,-77.942284],[74.999992,-69.903809],[-45.000031,-77.942284],[-75.000031,-69.903809],[-105.000031,-77.942284],[-126.961555,-99.903809],[-135.000031,-129.903809],[-126.961555,-159.903809],[-105.000023,-181.865326],[-75.000031,-189.903809],[-45.000038,-181.865326],[-23.038509,-159.903824],[-15.000031,-129.903793],[-23.038506,-99.903809],[-90,0.000042],[-98.038475,30.000042],[-120,51.961567],[-150,60.000042],[-180,51.961567],[-201.961517,30.000046],[-210,0.000036],[-201.961517,-29.999956],[-180,-51.961483],[-150,-59.999958],[-120.000008,-51.961483],[-98.038483,-29.999969],[-44.999954,77.942314],[-23.038429,99.903839],[-14.999954,129.903839],[-23.038429,159.903839],[-44.999954,181.865356],[-74.999954,189.903839],[-104.999954,181.865356],[-126.961479,159.903839],[-134.999954,129.903839],[-126.961479,99.903839],[-104.999947,77.942314],[-74.999954,69.903839],[44.999935,77.942314],[74.999939,69.903839],[104.999939,77.942314],[126.961464,99.903839],[134.999939,129.903839],[126.961464,159.903839],[104.999939,181.865356],[74.999939,189.903839],[44.999935,181.865356],[23.038414,159.903839],[14.999939,129.903839],[23.038414,99.903839],[240,-0.000005],[248.038483,-29.999998],[270,-51.961525],[300,-60],[330,-51.961525],[351.961517,-30.000011],[360,0.00001],[351.961517,30.000004],[330,51.961525],[300,60],[270,51.961517],[248.038483,29.999992],[173.205078,-100.000046],[165.166595,-130.000046],[173.205078,-160.000046],[195.166595,-181.961578],[225.166595,-190.000046],[255.166595,-181.961578],[277.128113,-160.000061],[285.166595,-130.000031],[277.128113,-100.000046],[255.166595,-78.038521],[225.166611,-70.000046],[195.16658,-78.038528],[119.999908,-207.846161],[98.038383,-229.807678],[89.999908,-259.807678],[98.038383,-289.807678],[119.999916,-311.769196],[149.999908,-319.807678],[179.999908,-311.769196],[201.961426,-289.807678],[209.999908,-259.807678],[201.961426,-229.807678],[179.999908,-207.846161],[149.999924,-199.807678],[-0.000157,-200],[-30.000158,-208.038483],[-51.961678,-230],[-60.000153,-260],[-51.961678,-290],[-30.000149,-311.961517],[-0.000153,-320],[29.99984,-311.961517],[51.961369,-290],[59.999847,-260],[51.961372,-230],[29.999849,-208.038483],[-120.000198,-207.845978],[-150.000198,-199.807495],[-180.000198,-207.845978],[-201.961731,-229.807495],[-210.000198,-259.807495],[-201.961731,-289.807495],[-180.000198,-311.769012],[-150.000198,-319.807495],[-120.000206,-311.769012],[-98.038681,-289.807495],[-90.000198,-259.807495],[-98.038673,-229.807495],[-173.205231,-99.999771],[-195.166748,-78.038246],[-225.166748,-69.999771],[-255.166748,-78.038246],[-277.128265,-99.999771],[-285.166748,-129.999771],[-277.128265,-159.999771],[-255.166748,-181.961304],[-225.166748,-189.999771],[-195.166748,-181.961304],[-173.205231,-159.999786],[-165.166748,-129.999756],[-240,0.000355],[-248.038483,30.000355],[-270,51.96188],[-300,60.000355],[-330,51.96188],[-351.961517,30.000359],[-360,0.00035],[-351.961517,-29.999643],[-330,-51.96117],[-300,-59.999645],[-270,-51.96117],[-248.038483,-29.999657],[-173.204926,100.000305],[-165.166443,130.000305],[-173.204926,160.000305],[-195.166443,181.961823],[-225.166443,190.000305],[-255.166443,181.961823],[-277.12796,160.000305],[-285.166443,130.000305],[-277.12796,100.000305],[-255.166443,78.03878],[-225.166443,70.000305],[-195.166443,78.03878],[-119.999588,207.846344],[-98.038063,229.807861],[-89.999588,259.807861],[-98.038063,289.807861],[-119.999588,311.769379],[-149.999588,319.807861],[-179.999588,311.769379],[-201.961121,289.807861],[-209.999588,259.807861],[-201.961121,229.807861],[-179.999588,207.846344],[-149.999588,199.807861],[0.000459,200],[30.00046,208.038483],[51.961987,230],[60.000462,260],[51.961987,290],[30.00046,311.961517],[0.000459,320],[-29.999542,311.961517],[-51.961063,290],[-59.999538,260],[-51.961063,230],[-29.999533,208.038483],[120.000519,207.845825],[150.000519,199.807343],[180.000519,207.845825],[201.962036,229.807343],[210.000519,259.807343],[201.962036,289.807343],[180.000519,311.76886],[150.000519,319.807343],[120.000519,311.76886],[98.038994,289.807343],[90.000519,259.807343],[98.038994,229.807343],[173.205353,99.999512],[195.16687,78.037987],[225.16687,69.999512],[255.16687,78.037987],[277.128387,99.999512],[285.16687,129.999512],[277.128387,159.999512],[255.16687,181.961029],[225.16687,189.999512],[195.16687,181.961029],[173.205353,159.999512],[165.16687,129.999512]]
Important! - repeat these steps each time you connect another LED ring. It’s much easier to find and fix problems, such as short-circuit connections between wires/pads, as you go rather than troubleshoot at the end with them all connected. If a short-circuit does happen and the connected LEDs get damaged, there’s less to replace if you test as you go.
Repeat the steps above to connect each LED ring, one at a time, testing each new LED ring as you go.
Possibly the MOST IMPORTANT step: please take lots of photos and videos of your Mega CycloHex and share them with me!


